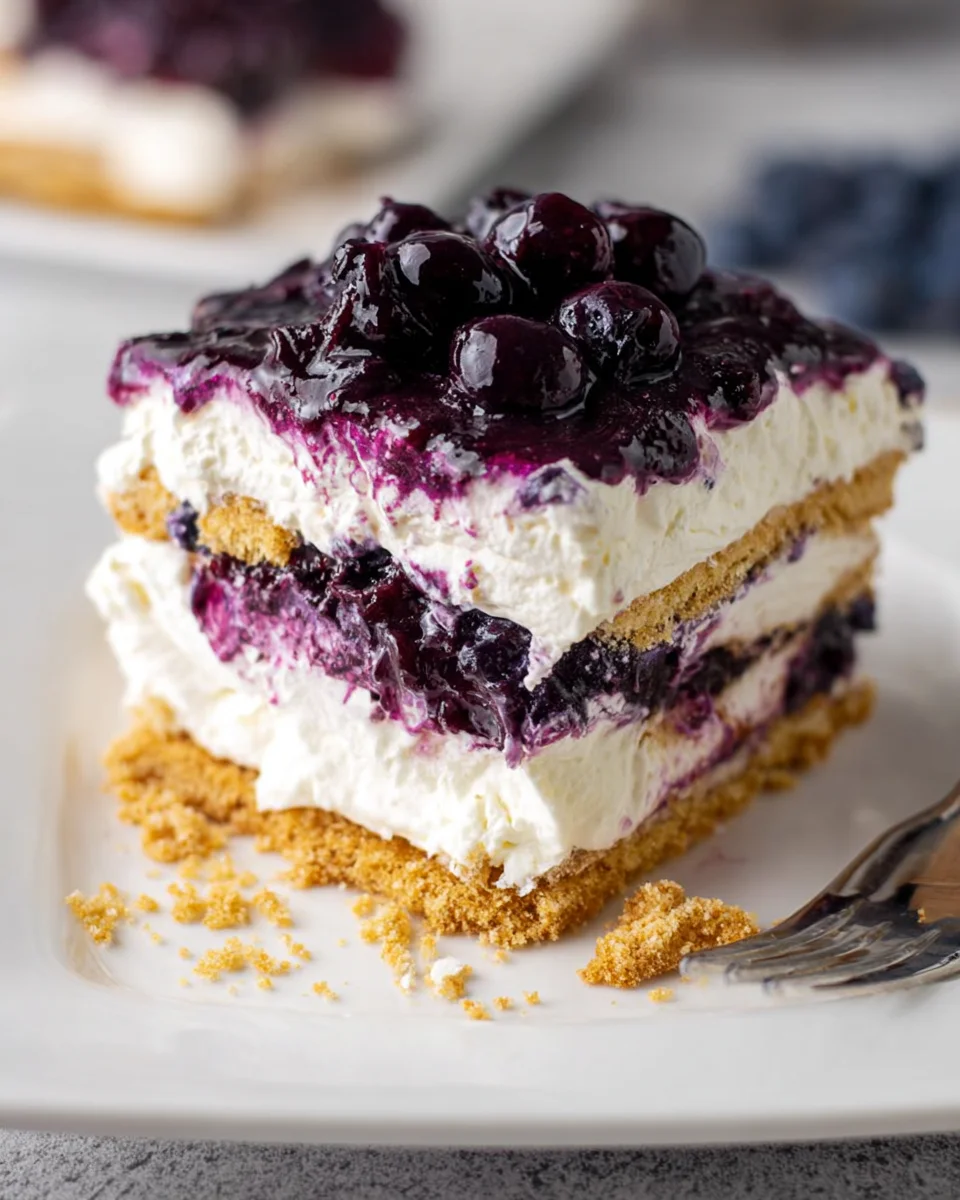
Introduction to Blueberry Cheesecake Icebox Cake
As a busy mom myself, I know how chaotic life can be. Yet, finding ways to celebrate even the smallest moments is what keeps our spirits high. That’s why I’m thrilled to share this Blueberry Cheesecake Icebox Cake with you! This delightful no-bake dessert is perfect for those hot summer days when you crave something sweet but don’t want to heat up the kitchen. With its luscious layers of cream cheese and juicy blueberries, it’s bound to impress your family and friends without taking up your precious time. Let’s create some happy memories together!
Why You’ll Love This Blueberry Cheesecake Icebox Cake
This Blueberry Cheesecake Icebox Cake checks all the boxes for a busy mom like me! First, it’s a no-bake dessert, so it saves time and energy in the kitchen. Second, every bite is a symphony of creamy sweetness balanced by tart blueberries. Lastly, it’s a crowd-pleaser, making it perfect for gatherings or casual family nights. You’ll be the star chef, with minimal fuss!
Ingredients for Blueberry Cheesecake Icebox Cake
Gathering all the right ingredients is half the battle won! For this Blueberry Cheesecake Icebox Cake, you’ll need a delightful mix of creamy, fruity, and crunchy components. Here’s what you’ll need:
- Graham Crackers: These will form the base layers, adding a delightful crunch. You can use whole wheat for a healthier spin.
- Whipping Cream: Essential for achieving that luscious, fluffy texture. Heavy cream works best but can be substituted with a dairy-free option if preferred.
- Cream Cheese: The star of the show! It provides that rich, creamy flavor. Be sure to let it soften before mixing for a smoother blend.
- Powdered Sugar: This sweetener dissolves nicely, ensuring your cheesecake filling remains smooth and delightful. If you’re looking for a sugar alternative, granulated sugar can work in a pinch.
- Blueberry Pie Filling: This adds a burst of flavor! Feel free to make your own or grab a can from the store for convenience.
- Blueberries (fresh or frozen): These gems not only taste fantastic but also provide vibrant color. I prefer fresh but frozen can be a great alternative, especially off-season.
- Sugar: This will sweeten your blueberry mixture. Reduce the amount if you prefer a less sweet dessert!
- Cornstarch: This thickening agent helps create a silky blueberry sauce. If you’re avoiding cornstarch, arrowroot powder can be a good substitute.
- Lemon Juice: Freshly squeezed enhances the flavors and adds a refreshing zing. If you’re in a pinch, water can be used instead.
The specific quantities for each ingredient are available at the bottom of the article for easy printing. So let’s ensure we have everything ready to whip up this heavenly cake!
How to Make Blueberry Cheesecake Icebox Cake
Now that we have all the ingredients lined up, let’s dive into the fun part: making this delightful Blueberry Cheesecake Icebox Cake! Trust me, you’ll be amazed at how simple it is to create a dessert that looks and tastes so fancy.
Step 1: Prepare the Whipping Cream
First things first, it’s time to whip that cream! Start by pouring the 2 cups of heavy whipping cream into a mixing bowl. Using an electric mixer, beat on medium-high speed until stiff peaks form. This means that when you lift the beaters, the cream stands up straight and does not droop. It’s like magic watching that liquid transform into fluffy clouds! Remember, don’t overbeat; you want it smooth and luscious.
Step 2: Mix the Cream Cheese
Next up, let’s focus on the cream cheese. In a separate bowl, beat together the 10 ounces of softened cream cheese and 3/4 cup of powdered sugar using a mixer. Blend until it’s velvety and smooth. You can add a splash of vanilla extract here for extra flavor if you’d like! Make sure to scrape down the sides of the bowl often so everything mixes evenly.
Step 3: Combine the Mixtures
Now comes the fun part: combining the two mixtures! Gently fold the whipped cream into the cream cheese mixture using a rubber spatula. It’s important to do this carefully so you don’t deflate the whipped cream. Think of it as cradling a baby bird; you want to keep it light and airy. This is where the magic happens—creating that luscious cream cheese filling!
Step 4: Layer the Ingredients
Let’s start building our masterpiece. Spread 2 tablespoons of the fluffiness onto the bottom of an 8×8 or 9×9 inch square pan, just to create a base. Then, lay down the graham crackers over the top, breaking them if necessary to fit. After that, spread about 1 and 1/2 cups of the cream cheese mixture over the crackers. Next, spoon 3/4 cup of blueberry pie filling on top and gently spread it out. Repeat this layering process until you’ve used all of your ingredients! Trust me, each layer adds to the delicious drama of this no-bake dessert.
Step 5: Refrigerate
Lastly, it’s time for a little patience. Cover the pan with plastic wrap and place it in the fridge for at least 2 hours to let the layers set together. I often recommend letting it chill longer—say, overnight—if you can wait! This allows the flavors to deepen and meld beautifully. When you’re ready to serve, you can top it with extra whipped cream or fresh blueberries for that final touch. Your blueberry cheesecake icebox cake is now ready to dazzle!
Tips for Success
- Use room temperature cream cheese for easy blending.
- Don’t overbeat the whipping cream; you want it light and fluffy, not grainy.
- Chill the dessert overnight for the best flavor development.
- For a fun twist, add a layer of crushed cookies or nuts between the layers.
- Garnish with fresh mint or lemon zest for an extra pop of color and flavor.

Equipment Needed
- Mixing bowls – any size will do, but a large one helps!
- Electric mixer – a hand mixer works great; you don’t need a stand mixer.
- Rubber spatula – for gentle folding and scraping the bowls.
- 8×8 or 9×9 inch square pan – I love using glass for easy serving!
- Plastic wrap – to cover the pan while chilling in the fridge.
Variations
- Fruit Flavors: Swap out blueberries for strawberries, raspberries, or peaches to create a different fruity twist.
- Nutty Crunch: Add chopped nuts like pecans or walnuts between layers for an extra crunch and flavor boost.
- Dairy-Free Option: Use coconut cream instead of whipping cream and dairy-free cream cheese for a delightful vegan version.
- Low-Sugar Version: Use a sugar substitute or reduce the amount of sugar in both the cheesecake filling and blueberry mixture for a healthier treat.
- Chocolate Layer: Incorporate a layer of chocolate graham crackers and some melted chocolate in the filling for a decadent chocolate-blueberry combo!
Serving Suggestions for Blueberry Cheesecake Icebox Cake
- Pair with a dollop of freshly whipped cream on top for added indulgence.
- Serve with a side of fresh berries for a burst of color and flavor.
- Complement with a refreshing iced tea or fruity lemonade.
- Add a sprig of mint for a pop of freshness and elegance.
- For an extra treat, try it alongside a scoop of vanilla ice cream!
FAQs about Blueberry Cheesecake Icebox Cake
Can I use different fruits in my Blueberry Cheesecake Icebox Cake?
Absolutely! You can substitute blueberries with strawberries, raspberries, or even peaches for a delicious variation. The method remains the same, but you’ll have a new fruity twist to enjoy!
How long can I store the Blueberry Cheesecake Icebox Cake?
This delightful no-bake dessert can be stored in the fridge for up to 3 days. Just make sure to cover it tightly with plastic wrap or in an airtight container to preserve its freshness.
Can I make the blueberry mixture in advance?
Yes! You can prepare the blueberry pie filling up to a day in advance. This not only saves time but also enhances the flavors, making your Blueberry Cheesecake Icebox Cake taste even better!
Is it possible to make this dessert gluten-free?
Definitely! Just replace the graham crackers with gluten-free ones, and you’ll have a wonderful gluten-free Blueberry Cheesecake Icebox Cake everyone can enjoy!
What can I do if my whipping cream doesn’t form stiff peaks?
If your whipping cream isn’t thickening, it may be that the cream was too warm. Make sure to use cold heavy cream and beat it at medium-high speed until the texture is light and fluffy. A chilled bowl can help too!
Final Thoughts
Making this Blueberry Cheesecake Icebox Cake truly brings joy to my kitchen. The vibrant colors and tantalizing flavors create an experience that goes beyond just dessert. It’s about sharing laughter and sweet moments with loved ones, savoring each creamy bite filled with joy. Whether it’s a family gathering or a simple weeknight treat, this cake will surely win hearts! Plus, the ease of preparation means you’ll spend more time enjoying the company than sweating in the kitchen. I can’t wait for you to experience the happiness this no-bake delight brings to your home!
Print
Blueberry Cheesecake Icebox Cake
- Prep Time: 30 minutes
- Cook Time: 10 minutes
- Total Time: 2 hours 40 minutes
- Yield: 8 servings 1x
- Category: Dessert
- Method: No-Bake
- Cuisine: American
- Diet: Vegetarian
Description
A delicious no-bake blueberry cheesecake icebox cake layered with graham crackers, cream cheese mixture, and blueberry pie filling.
Ingredients
- 8 sheets graham crackers
- 2 cups whipping cream, measured un whipped
- 10 oz cream cheese
- 3/4 cup powdered sugar
- 1 1/2 cup blueberry pie filling
- 3 cups blueberries, fresh or frozen
- 2/3 cup sugar
- 2 tablespoons cornstarch
- 1/4 cup freshly squeezed lemon juice, or water
Instructions
- Beat the whipping cream until stiff peaks form.
- In a separate bowl, beat together the cream cheese and powdered sugar until smooth.
- Gently fold the whipped cream into the cream cheese mixture.
- Spread 2 tablespoons of the cream cheese mixture onto the bottom of an 8×8 or 9×9 inch square pan.
- Arrange a layer of graham crackers onto the bottom of the pan. You may need to trim them slightly.
- Spread about 1/2 of the cream cheese mixture over top (about 1 1/2 cups).
- Spoon 3/4 cup of blueberry pie filling over top and spread into a layer.
- Add a layer of graham crackers over top. Then repeat the process with the rest of the cheesecake mixture, followed by another 3/4 cup of pie filling.
- Place in the fridge to set for at least 2 hours.
- When ready to serve, optionally top with more whipped cream and berries.
Notes
- The pie filling can be made in advance.
- Letting it sit in the fridge for longer than 2 hours will enhance the flavors.
- This dessert is perfect for summer gatherings.
Nutrition
- Serving Size: 1 slice
- Calories: 320
- Sugar: 22g
- Sodium: 150mg
- Fat: 21g
- Saturated Fat: 12g
- Unsaturated Fat: 8g
- Trans Fat: 0g
- Carbohydrates: 31g
- Fiber: 1g
- Protein: 4g
- Cholesterol: 60mg