Introduction to Easter Rice Krispie Bars
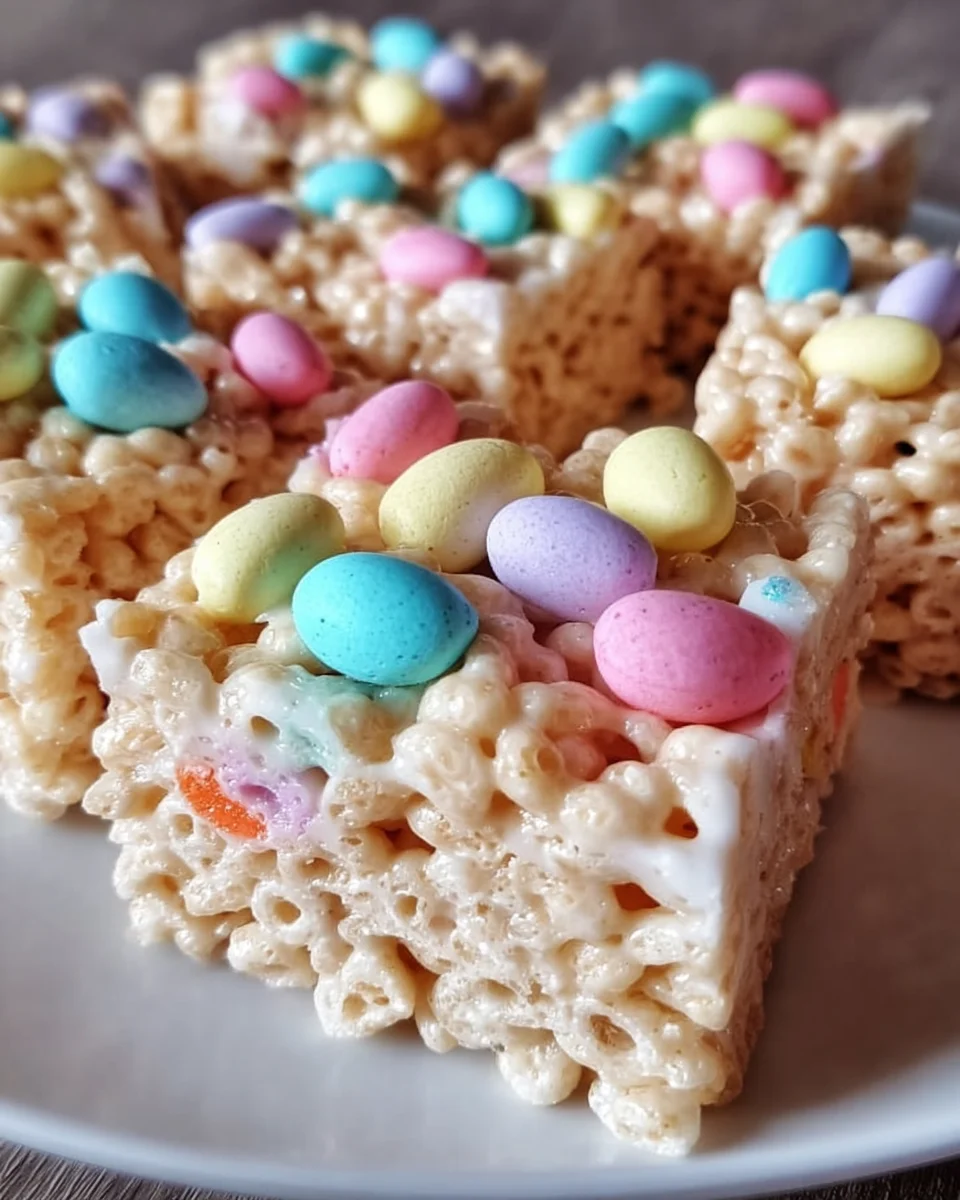
Spring is in the air, and with Easter just around the corner, it feels like the perfect time to whip up something sweet and festive! That’s where these delightful Easter Rice Krispie Bars come into play. Perfect for busy moms like me, these treats require minimal effort but deliver maximum joy. They’re not just easy to make; they’re a guaranteed hit with kids and adults alike. Picture a colorful, crunchy bar that brings smiles to faces around the table. Gather the family and create lasting memories while making these delicious treats!
Why You’ll Love This Easter Rice Krispie Bars
These Easter Rice Krispie Bars are a lifesaver for busy days! You can whip them up in just 20 minutes, making them the ideal dessert for a last-minute get-together. Plus, who can resist the soft, gooey goodness of marshmallows paired with the delightful crunch of Rice Krispies? They’re versatile, delicious, and bring a splash of color to your Easter celebrations, ensuring smiles all around!
Ingredients for Easter Rice Krispie Bars
Gathering the ingredients for these Easter Rice Krispie Bars is as fun as making them! Here’s what you’ll need:
- Rice Krispies cereal: The star of the show! These crispy little bites provide the perfect crunchy texture.
- Mini marshmallows: These sweet puffs melt down beautifully, creating the gooey goodness that binds everything together.
- Unsalted butter: Adds richness and a hint of needed fat to balance the texture. Using unsalted butter allows you to control the saltiness, making for the best flavor.
- Vanilla extract: Just a teaspoon of this enhances the sweetness and creates a well-rounded flavor profile that pairs beautifully with marshmallows.
- Pastel-colored candy-coated chocolate eggs or Easter-themed candies: These vibrant candies not only add a delightful crunch but also serve as a festive decoration. Oh, how they catch the eye!
Feel free to get creative! You can swap the pastel candies for other colorful treats like sprinkles or dried fruits if you’re looking for a different twist.
For precise measurements, check out the printable recipe at the bottom of this article!
How to Make Easter Rice Krispie Bars
Making these Easter Rice Krispie Bars is a breeze. With just a few steps, you’ll transform simple ingredients into a delightful treat that everyone will adore. Let’s get into the nitty-gritty of this fun process!
Step 1: Prepare the Baking Dish
First, let’s ensure that our bars come out easily. Grease a 9×13-inch baking dish with some soft butter or a non-stick spray. This way, you’ll avoid the dreaded sticking, making it easier to cut into neat squares later. Trust me, no one wants a crumbled mess!
Step 2: Melt the Butter
In a large pot, melt the unsalted butter over low heat. This is important because cooking too fast can burn the butter. You want it just melt, becoming the perfect base for our gooey marshmallow goodness. It’s like a warm hug—rich and comforting!
Step 3: Melt the Marshmallows
Once the butter has melted, add the mini marshmallows. Stir continuously until they’re fully melted and smooth, like a cloud of sugary indulgence. Make sure to keep stirring to avoid any clumps. You want that silky texture, which ensures every bite is delightful!
Step 4: Combine with Vanilla
Now, remove the pot from heat and stir in the vanilla extract. This little splash of flavor enhances the overall taste, making your Easter Rice Krispie Bars unforgettable. It’s like that secret ingredient that puts a smile on everyone’s face!
Step 5: Fold in Rice Krispies
Next, it’s time to add the Rice Krispies cereal! Gently fold them into the marshmallow mixture. Use a spatula and make sure you coat every crispy piece with that gooey goodness. Remember, a gentle touch here prevents crushing the cereal—no one wants mushy bars!
Step 6: Add Candy Coated Eggs
For the festive touch, quickly fold in half of those colorful candy-coated chocolate eggs or Easter candies. These not only bring a cheerful vibe but also a delightful crunch. They’ll add bursts of sweetness that make every bite a little celebration!
Step 7: Press Mixture into Dish
Now, transfer the gooey mixture to your greased baking dish. Use a buttered spatula or a piece of wax paper to press it down evenly. It’s important to pack it firm enough to hold together but not so tight that it loses its airy texture. Think of it as giving your bars a cozy blanket!
Step 8: Cool and Cut
Lastly, allow the mixture to cool at room temperature for about 30 minutes. This will help it set properly. When you’re ready, grab a sharp knife and cut them into squares. A tip: running the knife under hot water makes cutting easier. Voilà! You’ve created a perfect batch of Easter Rice Krispie Bars!
Tips for Success
- Make sure to grease your baking dish well; this prevents sticking.
- For the smoothest marshmallow mixture, stir constantly while melting.
- Press the mixture down gently; too much pressure can lead to dense bars.
- Add extra candies or sprinkles for even more festive flair.
- Store in an airtight container to keep them fresh and chewy.
Equipment Needed

- Large pot: For melting butter and marshmallows. A large saucepan works just as well!
- Baking dish: A 9×13-inch dish is perfect. If you don’t have one, any similar-sized pan will do!
- Spatula: Needed for stirring and pressing. A wooden spoon can also work nicely.
- Wax paper: Helpful for pressing down the mixture. Plastic wrap is a good substitute if needed!
- Sharp knife: Essential for cutting the bars into squares. A pizza cutter can be an interesting alternative!
Variations for Easter Rice Krispie Bars
- Nutty Twist: Add chopped nuts like almonds or walnuts to the mixture for a crunchy texture.
- Chocolatey Goodness: Swirl in melted chocolate chips or drizzle chocolate over the bars before they cool for a sweet touch.
- Gluten-Free Option: Use gluten-free Rice Krispies to cater to those with dietary restrictions.
- Fruit Flavors: Incorporate dried fruits such as cranberries or apricots for a chewier bite and a burst of flavor!
- Rainbow Dream: Use a mix of colorful candies and sprinkles instead of just one type to create a vibrant, eye-catching treat.
Serving Suggestions
- Pair with a glass of refreshing lemonade for a sweet and tangy balance.
- Serve alongside colorful fruit salads for a vibrant, healthy touch.
- Present on a cheerful spring-themed platter to showcase the festive colors.
- Dress them up with a drizzle of chocolate sauce or whipped cream on the side!
FAQs about Easter Rice Krispie Bars
*What’s the best way to store Easter Rice Krispie Bars?*
To keep your Easter Rice Krispie Bars fresh, store them in an airtight container at room temperature. They’ll stay delicious for up to a week—if they last that long!
*Can I make these Rice Krispie bars ahead of time?*
Absolutely! These bars can be made a day or two in advance. Just store them properly, and they’ll be ready to impress your guests when you need them!
*What can I use instead of Rice Krispies?*
If you’re looking for a fun twist, try using another cereal like Cocoa Puffs or Fruity Pebbles. Or go for gluten-free options if needed. They add a unique flavor while keeping that crunch!
*Can I freeze Easter Rice Krispie Bars?*
Yes, you can freeze them! Wrap each bar in plastic wrap and place them in an airtight container. They’ll keep well for about a month. Just thaw them at room temperature before serving.
*How do I make these bars more festive for a party?*
Add colorful sprinkles or drizzle melted chocolate on top before serving. You could even use themed cookie cutters to create fun shapes. The possibilities are as endless as your creativity!
Final Thoughts
Creating these Easter Rice Krispie Bars is more than just baking; it’s about making memories. As the sweet aroma fills your kitchen, you’ll find laughter and joy bubbling up alongside those gooey treats. They’re perfect for gatherings, after-school snacks, or just to brighten a busy day. Plus, the vibrant colors can turn an ordinary moment into something truly special. Whether you’re enjoying them with family or gifting them to friends, these bars are sure to spark smiles. So gather your loved ones, dive into the fun, and let the Easter spirit shine through every delicious bite!
Print
Easter Rice Krispie Bars
- Prep Time: 10 minutes
- Cook Time: 10 minutes
- Total Time: 20 minutes
- Yield: 12 servings 1x
- Category: Dessert
- Method: Stovetop
- Cuisine: American
- Diet: Vegetarian
Description
Delicious and festive Easter Rice Krispie Bars that are easy to make and loved by everyone.
Ingredients
- 6 cups Rice Krispies cereal
- 4 cups mini marshmallows
- 3 tablespoons unsalted butter
- 1 teaspoon vanilla extract
- 1/2 cup pastel-colored candy-coated chocolate eggs or Easter-themed candies
Instructions
- Grease a 9×13-inch baking dish with butter or non-stick spray.
- In a large pot, melt the butter over low heat.
- Add the mini marshmallows and stir continuously until fully melted and smooth.
- Remove the pot from heat and stir in the vanilla extract.
- Immediately add the Rice Krispies cereal and gently fold until the cereal is evenly coated with the marshmallow mixture.
- Quickly fold in half of the pastel-colored candy-coated eggs or Easter candies.
- Transfer the mixture to the prepared baking dish and press it down evenly using a buttered spatula or wax paper.
- Sprinkle the remaining candies on top and gently press them into the bars.
- Allow the bars to cool at room temperature for about 30 minutes before cutting into squares.
Notes
- Store in an airtight container for up to a week.
- To make them extra festive, you can add sprinkles on top before they cool.
Nutrition
- Serving Size: 1 bar
- Calories: 150
- Sugar: 10g
- Sodium: 60mg
- Fat: 5g
- Saturated Fat: 3g
- Unsaturated Fat: 2g
- Trans Fat: 0g
- Carbohydrates: 24g
- Fiber: 0g
- Protein: 1g
- Cholesterol: 10mg